get-into-teaching-app
Guide to creating content on the Get Into Teaching website
This page aims to be a reference for content editors that want to make changes to the Get Into Teaching website. It includes how the content is structured, tips on editing content and specific guides on creating certain types of content.
If you notice some guidance is missing, you can add to this page. Create a pull request to add the guidance so it can be approved by another member of the team. We usually add new guidance when intoducing a new element to the website, such as a promo, or new type of page. Make sure that you add the new section to the table of contents. You can view your changes before making them live in GitHub. Go to the pull request, click on the Files changed tab and click View file.
Table of Contents
- Setting up Codespaces and Github
- Finding a page/content to edit
- Creating a pull request
- Content editing info/tips
- Creating a new page
- Creating a subject page
- Creating an inspirational page
- Saving a change
- Previewing a change
- Search engine optimisation
- Navigation
- Internship providers
- Redirect URLs
- Finding links on the site
- When things go wrong
Setting up Codespaces and Github
You will need to download and set up an account on Github and Visual Studio Code with help from the delivery manager on the team.
Once you’re ready:
- Go to the master branch link: https://github.com/DFE-Digital/get-into-teaching-app
- Select the green button ‘<> Code’ and create a branch
- This will start ‘setting up a Codespace’
- Once this is loaded, go to the top left hand corner and select the three horizontal lines - this will open a drop down
- Select ‘Open in VS Code Desktop’
- This will open the file on Visual Studio Code
- When you run a codespace it will make up a branch name: when you next go on to github and want to run a codespace, you should use the same branch every time. You do not need to make a new one every time.
Finding a page/content to edit
When you want to edit content on the website the first step is to find out where that content resides in the repository.
The majority of web pages on the site are within the /app/views/content folders; this reflects the top-level pages of the website (including the home page). In the folders, blue arrow icons are the pages and the content, the red <> icons are components.
If, for example, you wanted to edit the ‘Teacher pay’ page content you would edit the file /app/views/content/life-as-a-teacher/pay-and-benefits/teacher-pay.md.
The structure here mimics the URL of the pages (the home page is a special case):
| URL | Content File |
|---|---|
| / | /app/views/content/home.md |
| /funding-and-support | /app/views/content/funding-and-support.md |
| /life-as-a-teacher/pay-and-benefits/teacher-pay | /app/views/content/life-as-a-teacher/pay-and-benefits/teacher-pay.md |
Some web pages are more structurally complex than others and are made up of multiple Markdown files that get pulled into a single page. The home page is a good example of this; in addition to the main content page in /app/views/content/home.md there are multiple other content files that reside under /app/views/content/home/*.md. If you can’t find the content you wish to edit in the main file for that page, it’s worth checking to see if it has a corresponding subdirectory with additional content files in.
If you can’t find a corresponding file in the /app/views/content directory for the web page you want to edit it may be a dynamically generated web page. These are constructed differently and the content may be in a template file or partial; your best bet here is to either search the whole repository for a bit of the text you wish to edit or to reach out to a developer to help you.
If you are looking to edit content associated with a form element in particular (for example, a label for a text input) then you should look in the translations file. It’s important to only change the text content in this file and not the Yaml keys that identify the content.
Creating a pull request
Pull requests are used in GitHub to allow you to propose changes to content by submitting code you’ve worked on for review before it’s merged into the main branch.
Once you’ve made your changes in your branch in VS Code, click on the Source Control button in the left side bar to create a pull request. Once the PR is created it will appear in the Pull requests tab in GitHub, there other team members can review your code.
Your PR will need to be reviewed by at least one other member of the team before it can be merged. If you have made changes to anything other can content, for example a spec file, you will need to get a developer to review the code. You can do this by requesting a review on the Slack channel #git-dev-review.
Content editing info/tips
Tone of voice
It’s important that the content on Get Into Teaching uses a consistent tone of voice.
When writing new content, you can look at the language we use on other pages to help keep it consistent. For example, we always refer to children in schools as pupils, rather than students.
When writing content for non-UK teachers and trainees do not use contractions, for example, use ‘you will’, instead of ‘you’ll’. Do not use negative contractions anywhere on the site (see the GOV.UK style guide for more information).
Some useful resources include:
- GIT brand book and messaging matrix (available on Sharepoint)
- accessibility content guidance
- GOV.UK style guide
- Department for Education style guide
In some cases, policy teams may ask us to word things in a certain way or include specific information. Unless there are commercial reasons why we need to use certain language, we can amend requested wording as needed to be consistent with the Get Into Teaching tone of voice.
Using Markdown
The majority of pages on the website are formatted in Markdown, which is a lightweight markup language designed for creating and formatting text.
Markdown tutorial is useful when learning to write content in Github https://www.markdowntutorial.com/
There is a Markdown Cheat Sheet that serves as a good reference on how to standard formatting, such as making something bold or italic. In conjunction with page frontmatter (see below) we can do some extra GiT-specific things in our Markdown, which this section aims to explain.
You’ll need to check if the page is in markdown or html as some pages have been coded in html. Depending on which it is you need to make sure you’re consistent, so for e.g. if you have a section in markdown you cannot add a link using html code it needs to also be in markdown.
Headings
Where possible we should use the HeadingComponent to render a heading; especially if it contains a caption. For example:
render HeadingComponent.new(
  heading: "My heading",
  tag: :h2,
  heading_size: :l,
  caption: "My caption",
  caption_size: :m
)
Frontmatter
Whilst the content of a page can often be expressed in Markdown there are some additional aspects/metadata that need to be defined separately (such as the title of the page, content for search engine optimisation, etc). We use frontmatter for this purpose, which is a section of Yaml at the top of each Markdown content file:
---
single_value: "a single value"
multiple_values:
  - "one"
  - "two"
nested:
  value:
    here: "some nested value"
---
Knowing which frontmatter values are available for a page is not always obvious, but the best method is to look at a similar page and copy the frontmatter from there (or look at the page examples in this document).
Breadcrumbs
Breadcrumbs are included by default on most layouts with the exception of registration layouts. You can chose to optionally disable breadcrumbs by setting the following in the front matter:
---
breadcrumbs: false
---
Links
Whilst links are just standard Markdown, it’s worth noting that if you are linking internally to another web page on the GIT website you should only include the path, for example [find an event](/events) instead of [find an event](https://getintoteaching.education.gov.uk/events). We do this so that the links work on all our test environments as well as production.
Prevent indexing
Sometimes we don’t want our content pages to be indexed by Google and other search engines (often when we’re A/B testing the variant should not be indexed). You can achieve this by adding a noindex: true entry to the page frontmatter.
Adding a quote
To add a standard quote, render the quote in the frontmatter of your markdown file:
quote: jennifer: text: “My mentor was highly knowledgeable and experienced, and had high expectations which helped me to flourish.” name: “Jennifer, trainee teacher” classes: quote–indent
To add a quote in an erb file, use the following code:
<%= render Content::QuoteComponent.new(
  text: "For me, science is all about being inquisitive. I was always the kid in class who was thinking, 'I wonder how that works, or I wonder why that does that'. I recognise that so much in the kids I teach and being able to give them the tools to develop that curiosity and knowledge is genuinely exhilarating.",
  name: "Holly, science teacher",
  large: false
) %>
Adding a quote with image component
Add this code to a html file:
<div class="row">
  <div class="col-space-l col-space-l-top">
    <%= render Content::QuoteWithImageComponent.new(
      title: "Example title to go here",
      text: "<h4>Heading if neededd</h4><p>Example information or quote</p><a href='#'>Link text/a>",
      quotes: false,
      background_color: "blue",
      heading_color: "pink",
      image_path: "static/images/content/hero-images/0034.jpg"
    ) %>
  </div>
</div>
You can edit the colours used such as “yellow”, “pink”, “green”, “blue” and “purple”. You can also specify whether you want the quote marks to appear by using true or false in the quotes parameter. For shorter quotes its better to use an image with a height cropped to around 300 pixels.
When using in a Markdown file, copy the above code into a new html file and link to the file in the Markdown code, in the same way you would when creating a subject page:
content:
  - "content/life-as-a-teacher/pay-and-benefits/quote"
Adding a document, image or video
If you need to include a link to a document or embed an image in your page content you’ll need to first add the file to the repository. Any documents should be placed in /app/webpacker/documents and images in /app/webpacker/images/content (under a subdirectory if suitable). You can then reference the files in your Markdown content (note the paths used to reference here will differ to the location of the file - use /media instead of /app/webpacker):
[Download a document](static/documents/my-document.pdf)

Images should be appropriately scaled and compressed prior to adding them to the website.
Hero images and text
Most of the web pages on the site have a hero section that can be customised in frontmatter; the hero section is at the top of the page and usually consists of a large image, heading and some text - these are the available options, though not all are required:
heading: Hero heading
subtitle: Hero subtitle
subtitle_link: /subtitle/link
subtitle_button: Button text
image: /path/to/image.jpg
title_paragraph: Paragraph of text
title_bg_color: yellow
hero_bg_color: white
hero_blend_content: true
Hero images are sized at 1000 pixels wide by 667 high and the mobile and tablet versions are 600 x 400 pixels. You can use a photo editing site online such as Photopea to resize images.
Alt text
The images used in the hero now pull their alt text from a central store. This allows us to set it once and include it wherever the image is used. The data is stored in config/images.yml and the format is as follows:
"static/images/content/hero-images/0032.jpg":
  alt: "An English teacher talking to pupils in a classroom."
  variants:
    - "static/images/content/hero-images/0032--mobile.jpg"
    - "static/images/content/hero-images/0032--tablet.jpg"
The key ("static/images/content/hero-images/0032.jpg") is the primary variant of the image, the full resolution one. Beneath it the following items are nested:
alt:- the alt text for the image, wrapped in quotesvariants- a list of other versions of the same image. The alternate versions can be thumbnails or crops and are considered alternates if the samealttext can be applied to them as the primary variant
Adding YouTube videos
To add a YouTube video to your content you need to know the video ID. You can find this out by visiting the video on youtube.com and looking in the address bar of your browser (it is in the format watch?v=<video_id>).
Once you have the video ID you can declare the video in the frontmatter of your page and reference it in the content:
---
youtube_video:
  return-to-teaching-advisers-video:
    id: 2NrLm_XId4k
    title: A video about what Return to Teaching Advisers do
---

# My page

$return-to-teaching-advisers-video$
To render vertical videos (9:16 aspect ratio), you can pass in the optional orientation: "portrait" parameter.
---
youtube_video:
  return-to-teaching-advisers-video:
    id: 2NrLm_XId4k
    title: A video about what Return to Teaching Advisers do
    orientation: portrait
---
Transcripts
Every video added to the website must have a transcript. A transcript is the text of all the content in a video, presented separately from it.
Transcripts offer an alternative way to engage with content for users with access needs. They are also often found useful for other users. For example, some people may prefer to read content rather than watch a video.
Transcripts must:
- be linked underneath the video
- include all audio and visual information in the video, for example speaker names
If you auto-generate a transcript, you must check it for accuracy.
Transcript page files should be created in the ‘content/shared/transcripts’ folder.
Example of a link to a video transcript:
Read the [transcript for the video 'What teaching taught me - Josh'](/shared/transcripts/what-teaching-taught-me-josh).
<p>Read the <a href="/shared/transcripts/what-teaching-taught-me-josh">transcript for the 'What teaching taught me - Josh' video</a>.</p>
Example of a video transcript:
---
title: Transcript for the video 'What teaching taught me - Josh'
description: Full transcript for the video 'What teaching taught me - Josh'
---
My name’s Josh. I teach science, specifically biology. I did want to be a physiotherapist, went through university, soon realised that it wasn’t for me. I went into a school and then it just clicked straight away.

My confidence has grown outside of school, partially because of teaching, because you understand who you are more.

Working with students with special educational needs, of which I am and was one of those students. Helping me understand my deafness, teaching my students sign and what it’s like to be someone that’s deaf. I ask a whole class to answer in a sign letter or a sign word. It really helps and informs your practice.

After a couple of years, I became a deputy head of year, which is a pastoral responsibility. After a year of that, I then became a head of year. My school has over 1,400 students in it. To be a leader in the leadership team of that school, the impact you can have is huge. That’s the next step that I’m taking.
---
iframe
When adding an iFrame element as part of Markdown content or a HTML page we should ensure it has an appropriate title attribute that explains the contents of the iFrame (in most of our cases we are showing a video). For example:
<iframe
  title="A video about returning to teaching"
  ...
></iframe>
Calls to action
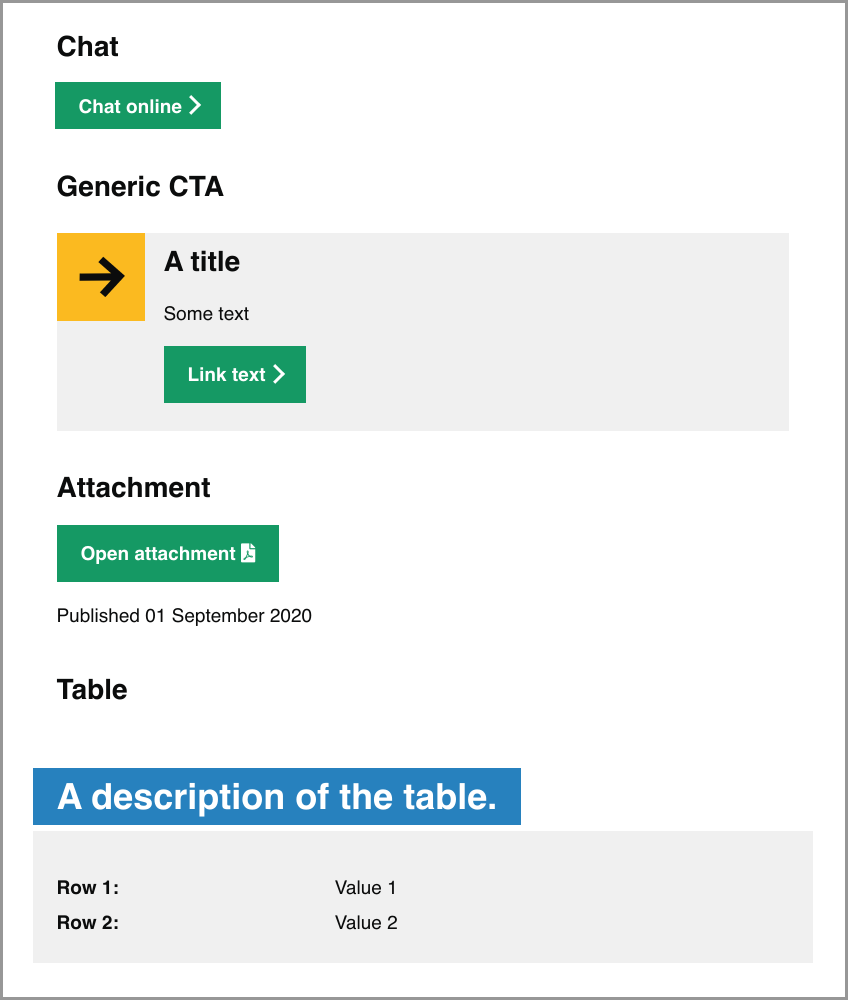
We use several calls to action (CTAs) across the website. These highlight important information and links to users.
Chat and generic CTAs
We use these CTAs for:
- a green chat online button
- a generic call to action component with customisable icons
- an attachment button
- a table
---
calls_to_action:
  chat:
    name: chat
    arguments: {}
  generic:
    name: simple
    arguments:
      title: A title
      text: Some text
      icon: "icon-arrow"
      link_text: Link text
      link_target: "https://website.com/"
  attachment:
    name: attachment
    arguments:
      text: Open attachment
      file_path: static/documents/a_report.pdf
      file_type: PDF
      published_at: 01 September 2020
  table:
    name: feature_table
    arguments:
      - "Row 1": "Value 1"
      "Row 2": "Value 2"
      - "A description of the table"
---

### Chat

$chat$

### Generic CTA

$generic$

### Attachment

$attachment$

### Table

$table$
Alternatively, if you need to insert the components in an erb file, you can call them like this:
<%= render ChatComponent.new %>

<%= render CallsToAction::SimpleComponent.new(
  title: "A title",
  text: "Some text",
  icon: "icon-arrow",
  link_text: "Link text",
  link_target: "https://www.somewhere.test/")
%>

<%= render CallsToAction::AttachmentComponent.new(
  text: "Open attachment",
  file_path: "static/images/dfelogo.png",
  file_type: "PNG",
  file_size: "100kb",
  published_at: "2 May 2025",
) %>

<%= render Content::FeatureTableComponent.new(
  {
    "Feature 1" => "Value 1",
    "Feature 2" => "Value 2",
    "Feature 3" => "Value 3",
  },
  title = "Exciting features",
  heading_tag: "h3",
) %>
The above CTAs render out as follows:
Adviser CTA component
You can use the adviser CTA component to create a call to action to invite users to sign up for the Get an adviser service. You can use the component directly in markdown files, or in ERB-HTMl partials. It takes the following parameters and all are optional - if not specified a default value will be used:
- title
- text
- image
- link_text
- link_target
- classes
- border
- heading_tag
---
cta_adviser:
  adviser1:
    title: "Optional title"
    text: "Optional text"
    image: "/optional/path/to/image"
    link_text: "Optional link text"
    link_target: "/optional/path"
    classes: ["class1", "class2", "class3"]
    border: true
    heading_tag: (optional as the default is h2, or specify an option: "h1", "h2", "h3, "h4")
---

# My page

$adviser1$
Alternatively, if you need to insert an adviser component in an erb file, you can call it like this:
<%= render CallsToAction::AdviserComponent.new(
  title: "Optional title",
  text: "Optional text",
  image: "/optional/path/to/image",
  link_text: "Optional link text",
  link_target: "/optional/path",
  classes: ["class1", "class2", "class3"],
  border: true,
  heading_tag: (optional as the default is h2, or specify an option: "h1", "h2", "h3, "h4")
)%>
Routes CTA component
You can use the routes CTA component to create a call to action to invite users to find their route into teaching. You can use the component directly in markdown files, or in ERB-HTMl partials. It takes the following parameters and all are optional - if not specified a default value will be used:
- title
- text
- image
- link_text
- link_target
- classes
- border
- heading_tag
---
cta_routes:
  routes:
    title: "Optional title"
    text: "Optional text"
    image: "static/images/routes.png"
    link_text: "Optional link text"
    link_target: "/optional/path"
    classes: ["class1", "class2", "class3"]
    border: true,
    heading_tag: (optional as the default is h2, or specify an option: "h1", "h2", "h3, "h4")
---
Mailing list CTA component
You can use the Mailing list CTA component to create a call to action to invite users to sign up to the mailing list. You can use the component directly in markdown files, or in ERB-HTMl partials. It takes the following parameters and all are optional - if not specified a default value will be used:
- title
- text
- image
- link_text
- link_target
- classes
- border
- heading_tag
---
cta_mailinglist:
  mailinglist:
    title: "Optional title"
    text: "Optional text"
    image: "static/images/routes.png"
    link_text: "Optional link text"
    link_target: "/optional/path"
    classes: ["class1", "class2", "class3"]
    border: true,
    heading_tag: (optional as the default is h2, or specify an option: "h1", "h2", "h3, "h4")
---

# My page

$mailinglist$
Alternatively, if you need to insert a mailing lists component in an erb file, you can call it like this:
<%= render CallsToAction::MailinglistComponent.new(
  title: "Optional title",
  text: "Optional text",
  image: "static/images/image.jpg",
  link_text: "Optional link text",
  link_target: "/optional/path",
  classes: ["class1", "class2", "class3"],
  border: true,
  heading_tag: (optional as the default is h2, or specify an option: "h1", "h2", "h3, "h4")
)%>
Green arrow link CTA component
You can use the green arrow link CTA component to create a more prominent hyperlink call to action.
You should use the component:
- when it’s the next logical step on users’ journeys
- more than once on a page
You should not use the component:
- on every page, if there is not a suitable use for it
- to direct to pages that are not useful for most people e.g. veterans, SKITT
- to direct to external sites like UCAS or Teach First
How to use the green arrow component
The green arrow links should not have a full-stop after the text.
If you are using a green arrow link on a page, then do not link full sentences on a separate line as well.
It takes the following parameters and both should be specified:
- link_text
- link_target
---
cta_arrow_link:
  events:
    link_target: "/events"
    link_text: "Find a training provider event"
---

# My page

$events$
Alternatively, if you need to insert a green arrow component in an erb file, you can call it like this:
<%= render CallsToAction::ArrowLinkComponent.new(link_target: "/events/about-get-into-teaching-event", link_text: "Find a Get Into Teaching event") %>
Block promos
You can use either 2 or 3 block promos at once and pick from the 10 available options:
| Promo | Code |
|---|---|
| Mailing list | <%= render CallsToAction::MailinglistBlockComponent.new %> |
| Routes | <%= render CallsToAction::RoutesBlockComponent.new %> |
| Advisers | <%= render CallsToAction::AdviserBlockComponent.new %> |
| School experience | <%= render CallsToAction::GetSchoolExperienceBlockComponent.new %> |
| Find | <%= render CallsToAction::FindBlockComponent.new %> |
| Apply | <%= render CallsToAction::ApplyBlockComponent.new %> |
| Events | <%= render CallsToAction::EventsBlockComponent.new %> |
| Life as a teacher links | <%= render CallsToAction::LifeAsAteacherBlockComponent.new %> |
| Teacher stories links | <%= render CallsToAction::TeacherStoriesBlockComponent.new %> |
| Get support links | <%= render CallsToAction::GetSupportBlockComponent.new %> |
To add them to a html file, use the above code inside the following container. Here you can also specify if you want different text to the default text:
<div class="row">
  <section class="container">
    <section class="image-blocks">
      <%= render CallsToAction::MailinglistBlockComponent.new %>
      <%= render CallsToAction::RoutesBlockComponent.new %>
      <%= render CallsToAction::AdviserBlockComponent.new(
          title: "Example title",
          image: "image.jpg",
          title_color: "green",
          text: "Example text",
          link_text: "Example link",
          link_target: "link/example"
      ) %>
    </section>
  </section>
</div>
Where you’re using the same combination of promos across multiple pages, you can store the block promo code in file and render it on the pages that need it.
If you want to use these inside a markdown file, create a separate html file and use the above code inside it. Then on your markdown file you can link to it like this example:
content:
  - "content/shared/subject-pages/block-promo"
Accessibility
Link text
All links should be descriptive and make sense in isolation.
Avoid:
- including punctuation in link text
- anchor links to content on the same page, or another page
- using the same link text to link to different places
- linking to the same place more than once, particularly if using different link text
- having 2 or more hyperlinks close together on the page
By default, all links will open in the same tab. You should only open a link in a new tab if the user will risk losing key information on the page. For example, a link to more information in a form.
Links that direct to external sites (e.g. non-GOV.UK) should explicitly say their destination and should open in a new tab.
Find more guidance about writing accessible link text on GOV.UK.
Headings
The correct H1, H2, H3, H4 heading tags must be used to structure content. They should also be used in sequential order. For example, you must not skip from a H1 to using a H3.
Heading text should also be unique and easy to distinguish from other headings on the page.
Contractions
Contractions can make content easier to read, but should be used consistently.
Positive contractions like you’ll, it’s and we’ve can be used on Get Into Teaching.
When writing content for non-UK teachers and trainees do not use contractions.
Do not use negative contractions anywhere on the site (see the GOV.UK style guide for more information).
Insets and expander components for non-UK content
If you need to call out something important in a page and differentiate it from the surrounding text, you can use the inset or expander components. Specify the component in the frontmatter and then include it anywhere in the page. We use the purple colour for non-UK content and the purple-white colour for non-UK content on a grey background.
Inset component for non-UK content
You do not need to include both a heading and title in the inset text.
The heading tag will default to a h2, but you can override this by optionally specifying the heading_tag parameter.
---
inset_text:
  important-content:
    header: Optional title header
    title: Optional title
    text: Text that can contain <a href="#">links</a>
    color: yellow|grey|purple|purple-white
    heading_tag: "h3"
---

# My page content

$important-content$
If you need to insert an inset text component in an erb file:
<%= render Content::InsetTextComponent.new(
  header: "Non-UK citizens:",
  text: "You can call us on <a href=\"tel:+448003892500\">+44 800 389 2500</a>, or use the free live chat service. Calls will be charged at your country's standard rate.",
  color: "purple-white",
  heading_tag: "h3"
  ) %>
Use this component for non-UK content when:
- it will be the only non-UK component on the page
- you need to call out a short amount of non-UK content
- you need to call out non-UK content within another component, for example the funding widget
If using this component for non-UK content:
- always use the purple colour (or purple-white on a grey background)
- the header must be ‘Non-UK citizens:’
If the content is for a specific group of non-UK citizens, for example, ‘Refugees and asylum seekers’ you can change the header. If you change the header to anything other than ‘Non-UK citizens’, you may need to manually add a colon after the header text, to do this, add quotation marks around the content and colon.
If you need to call out non-UK content several times on a page, or you need to call out a singular large amount of non-UK content, you can use the expander.
Expander component for non-UK content
You can use the expander component to highlight content for a non-UK audience, which is rendered as an expandable inset box. Specify the component in the frontmatter and then include it anywhere in the page. Only the title and text parameters are required:
---
expander:
  check-your-qualifications:
    title: Check your qualifications
    text: If you're a non-UK citizen and need a visa to come to the UK to train to teach, you need to make sure the course you’re applying for sponsors visas.
    link_title: Find out more about how to apply for a visa to train to teach in England
    link_url: /non-uk-teachers/visas-for-non-uk-trainees

  another-example:
    title: Another example
    text: Lorem ipsum dolor sit amet, consectetur adipiscing elit. Donec ullamcorper, purus eget lobortis maximus, diam leo consequat tellus, in interdum odio nisl sed nibh.
    header: Non-UK citizens
---


# My page content

$check-your-qualifications$

$another-example$
If you need to insert an expander into an erb file:
<%= render Content::ExpanderComponent.new(
    title: "check your qualifications",
    text: "If you have qualifications from outside the UK, you'll need to show that they meet the standards set for teacher training in England.",
    link_title: "You can get help comparing English and international qualifications.",
    link_url: "/non-uk-teachers/non-uk-qualifications",
  ) %>
Using the same content across multiple pages (partials)
If the content you’re creating will be used elsewhere on the site in the exact same format, you may want to create a partial. This is a snippet of code that you can render in one line. This saves you have having to write the same things in more than one place on the website. It also means maintenance of the site is easier as any changes you make can be done in one central place rather having to keep track of what information is on what pages.
To create a partial go to the /app/views/content/shared folder then either select an appropriate file or create your own folder. Then create a file. In the file place the HTML code that you would like to replicate on multiple pages.
<div class="check-qualifications">
  <h3>Check your qualifications</h3>
  <p>To train to teach in England, you'll need:</p>
  <ul>
    <li>GCSEs at grade 4 (C) or above in English and maths (and science if you want to teach primary)</li>
    <li>a bachelor's degree in any subject</li>
  </ul>
  <p>Having relevant A levels can show your subject knowledge, if you do not have a degree in your chosen subject.</p>
</div>
Then, when you are working in another HTML file and want to render your code all you have to do is reference the code you created as follows:
<%= render 'content/shared/qualifications-training/check_qualifications' %>
If you need a specific change across each version of your code such as the subject, it is possible to create a variable. All you have to do is reference something in the frontmatter. In the following frontmatter the subject is chemistry.
title: Become a chemistry teacher
subject: chemistry
title_paragraph: |-
  <p>
  As a chemistry teacher, you'll spark curiosity and challenge young minds to explore the fundamental principles that govern our world. You'll inspire students to question, experiment, and discover, fuelling their passion for science.</p>
  <p>
  Tax-free bursaries of $bursaries_postgraduate_chemistry$ or scholarships of $scholarships_chemistry$ are available for eligible trainee chemistry teachers.</p>
description: |-
    Find out how to become a chemistry teacher, including what you'll teach and what funding is available to help you train.
layout: "layouts/minimal"
colour: pastel yellow-yellow
image: "static/images/content/hero-images/chemistry.jpg"
content:
  - "content/shared/subject-pages/header"
  - "content/life-as-a-teacher/explore-subjects/chemistry/article"
To create a variable that references the frontmatter simply copy the format below. This will look at the frontmatter, then whatever you reference in the square brackets. In this case, it will look for subject and will render chemistry. This can be changed for anything as long as it is referenced in the frontmatter.
<%= @front_matter["subject"] %>
This means that you can use the following code over many pages so that each page has its own unique subject rendered.
<div class="check-qualifications">
  <h3>Check your qualifications</h3>
  <p>To train to teach <%= @front_matter["subject"] %> in England, you'll need:</p>
  <ul>
    <li>GCSEs at grade 4 (C) or above in English and maths (and science if you want to teach primary)</li>
    <li>a bachelor's degree in any subject</li>
  </ul>
  <p>Having relevant A levels can show your subject knowledge, if you do not have a degree in <%= @front_matter["subject"] %>.</p>
</div>
Values
You can use the values system to maintain key values (e.g. salaries, bursaries, fees etc) in a single file, and then use these values throughout the site’s content. Set up a list of values in one or more YML files stored in the config/values/ folder (or sub-folder), for example config/values/salaries.yml:
salaries:
  example:
    max: £40,000
These values can then be used in markdown files by referencing the value as $value_name$, e.g. $salaries_example_max$. Note that structured composite keys will be flattened to a single key.
An example markdown implementation might be:
# Starting salary

All qualified teachers will have a starting salary of at least $salaries_starting_min$ (or higher in London).
Values can be used in ERB templates using <%= value :value_name %> (or as a shorthand, <%= v :value_name %>).
An example ERB implementation might be:
<h1>Starting salary</h1>
<p>
  All qualified teachers will have a starting salary of at least <%= v :salaries_starting_min %> (or higher in London).
</p>
Values can also be utilised in the YAML-based internationalisation (I18n) translation definitions as used in the funding widget. The value should be specified as %{value_name}.
An example YAML implementation might be:
en:
  funding_widget:
    subjects:
      maths:
        name: "Maths"
        group: "Secondary"
        sub_head: "Maths - starting salary: %{salaries_starting_min}"
        funding: "Bursaries of %{bursaries_postgraduate_maths} are available."
A list of the current values available on the site can be viewed at the /values endpoint.
Values should be named using only lowercase characters a to z, the numbers 0 to 9, and the underscore _ character. Unsupported characters such as the hyphen - are converted into underscores.
Creating a new page
Make sure you start by creating a new branch on master
To do this you will need to:
- always open Visual Studio Code from https://github.com/DFE-Digital/get-into-teaching-app and open from the green code button
- once Visual Studio Code is open, click the search bar and select ‘Create new branch’
- type in the name of your new branch and press enter
- if your branch has been created, it will appear as a name in the bottom left hand corner, next to the blue tab of the codespace name
Make sure you’re in the new branch when you create the doc and not master as you can’t make changes to the master doc
Navigate to the left hand side bar, where you want the new page to sit Right hand click and select ‘New file’
When you name the file you’ll have to name it depending on whether the file in going to be written in html or markdown. If the file is markdown then put .md at the end of the file, e.g. when-to-apply.md
If the file is html, start the file name with an underscore and then put .html.erb at the end of the file, e.g. _categories.html.erb
There are different reasons why you might want a file to be a specific type which you can discuss with a developer or interaction designer. Generally it’s more straight forward to write something in Markdown so this is used for most content files. However, html can be styled more easily so it is possible the file has been written in this way to feature a specific component such as a styled quote.
If you have created a Markdown page - you will need to fill in the following details at the top of the Markdown file. You will not need to fill in the navigation details if the page sits in a sub category, e.g. Life as a teacher.
title: title will appear in the browser tab
heading: this is the h1 for the page - only needed if you want the h1 and the title to be different. If not, just add the title
| description: must start with | - and then you can write the text here |
navigation: this is to decide where the tile for this page will sit on the page - you will need to check what the other pages are listed as. They will be formatted like ‘30.20’ - ‘30’ will stand for the category page (in this case, how to apply) and the ‘20’ will be the order it sits in on the tiles. These usually are assigned in increments of 5, just in case you later want to move on further up it can be easily moved by assigning an in between number.
navigation_title: This is the title that will appear in the tiles
navigation_description: This is the description that will appear in the tiles
Here is a blank version to take and fill in:
- title:
- heading:
- description:
- navigation:
- navigation_title:
- navigation_description:
Creating a subject page
To create a new subject page, go to the folder content/life-as-a-teacher/explore-subjects. Then copy one of the current folders inside, e.g. English.
Right click the folder and rename it to the subject you want to create.
Inside the new folder you have created you will have 1 file:
- _article.html/erb
This is where the content for the page will sit.
Next, copy and paste a previous subject markdown (.md) file and rename it with the subject (e.g., business.md)
File changes:
The main content of subject pages should be written in HTML format in the article file. The structure of the subject pages are very similar so you should be able to use the subject you have copied as a guide.
Change all of the information in the article file that is not in a partial to be relevant to your subject. Then, you can optionally change the quote partials to be more relevant to your subject. Finally, look up the bursary and scholarship entitlement to the subject you are teaching. Then, change the information to the correct partial. All of the other information on the page should use the same partials so do not need to be edited.
Then update the Markdown file to edit the hero banner image, hero banner text (title and title_paragraph) and the page’s card component. You will also need to ensure the links to the html erb files are updated.
Subject.md
---
title: Become an English teacher
subject: English
title_paragraph: |-
  <p>
  Teaching English is more than just reading and writing. It's opening doors to new worlds and perspectives. You'll encourage a passion for language and a love of creativity, helping shape the voices of the future.</p>
  <p>
  Tax-free bursaries of $bursaries_postgraduate_english$ are available for eligible trainee English teachers.</p>
description: |-
    Find out how to become a English teacher, including what you'll teach and what funding is available to help you train.
layout: "layouts/minimal"
colour: pastel yellow-yellow
image: "static/images/content/hero-images/0032.jpg"

content:
  - "content/shared/subject-pages/header"
  - "content/life-as-a-teacher/explore-subjects/english/article"
---
Creating an inspiration page
Create a folder under ‘content/life-as-a-teacher/sub-category’
From a previous published page copy the files:
_article.html/erb _header.html.erb
Also copy and paste a previous ‘.md’ file and rename it with the title (e.g abigails-career-progression-story.md). This should live inside the subcategory folder, but not within the same folder as the article and header files.
File changes:
_header.html.erb – no changes needed
The main content of page should be written in HTML format using the following template as a guide:
_article.html/erb
Update the markdown file to edit the hero banner image, hero banner text (title and title_paragraph) and the page’s card component. Hero images on inspirational pages always use the grey-pink colours as shown below. You will also need to ensure the links to the html erb files are updated:
---
title: Abigail's favourite things about teaching
title_paragraph: |-
  <p>Abigail is a maths teacher from Wigan.</p>
description: |-
  Hear what Abigail enjoys most about teaching, and the impact she has through her job.
layout: "layouts/minimal"
colour: grey-pink
image: "static/images/content/case-studies/abigail.jpg"
content:
  - "content/life-as-a-teacher/why-teach/abigails-favourite-things-about-teaching/header"
  - "content/life-as-a-teacher/why-teach/abigails-favourite-things-about-teaching/article"
---
To add the pages card component go to the relevant category page eg. content/life-as-a-teacher/pay-and-benefits/_what-teachers-have-to-say.html.erb
And copy and paste an exiting card such as:
<ul>
  <%= render Content::InspirationCardComponent.new(heading_tag: "h3", card:
    OpenStruct.new(
      title: "Abigail's favourite things about teaching",
      description: "Hear what Abigail enjoys most about teaching, and the impact she has through her job.   ",
      path: "/life-as-a-teacher/why-teach/abigails-favourite-things-about-teaching",
      image: "static/images/content/case-studies/abigail.jpg"
    )) %>
</ul>
Update the title, description and image as required.
Saving a change
When you have made a change in Visual Studio Code and want to save your work.
- Save the change by CTRL-S
- This will cause a notification on the source control
- You will need to type a name for this change in the ‘message’ box
- Click the plus button that appears on the change - this will stage the change
- Click ‘sync changes’
- Commit the changes - make sure you name each commit in the box above the blue box where it says commit. You should name each commit to the specific change being made. This makes it easier to review any changes in the pull request and is useful for auditing.
- This will then open a pull request, you will need to fill in the details for this and click ‘Create pull request’ if you want to create one. But you may not want to create a pull request until you’ve made all of your changes so you don’t have to publish the branch or create a pull request until you’re ready
- You can monitor pull requests and assign reviewers here https://github.com/DFE-Digital/get-into-teaching-app/pulls
Previewing a change
- Go to the terminal tab on Visual Studio Code or go the top bar of your laptop - click terminal - click ‘new terminal’
- A line of code will come up and you should type in bin/dev, this will start a series of code
- When it has finished running, go into the ports tab and click the globe icon by 127.0.0.1:3000. This will open the browser
- If you’re not able to preview, try typing bundle install in the terminal followed by yarn install as this will update the libraries
- When putting in a page to preview it, right click the page title on the left hand side bar in Visual Studio Code and copy path
- Go to the url: http://127.0.0.1:3000 and insert a / on the end
- The copied path will be something like this: /workspaces/get-into-teaching-app/app/views/content/a-day-in-the-life-of-a-teacher.md
- Edit this path to only be the necessary page path: /a-day-in-the-life-of-a-teacher The url is http://127.0.0.1:3000/a-day-in-the-life-of-a-teacher
- You will need to CTL-Save a change in Visual Studio Code before viewing it in preview. You can just refresh the preview URL after you save a change to view it. But you don’t need to commit the change to be able to view it.
Search engine optimisation (SEO)
Whenever we add a new page to the GIT website, we need to make sure it’s optimised for search engines, this is known as search engine optimisation or SEO. This means that the page has the best chance possible of ranking in a high position in the search results when people type a related query in.
In Autumn 2024, an SEO consultant provided us with guidelines for how to improve the SEO on the website.
When uploading a new webpage, or reviewing an existing one, these are the main things you’ll need to do to make sure the page is optimised.
Find out what people are searching for
If you’re adding new content to the GIT website or reviewing existing content, any changes should be based on user needs. You can make sure the content is optimised for the search engines by looking at what users are searching for in Search Console. If you’re new to the team, speak to the Delivery Manager about getting set up on Search Console.
For example, if you were to create a page around being a primary school teacher some terms you might want to include could be:
- ‘skills to be a primary teacher’
- ‘primary education courses’
- ‘primary teaching with QTS’
Consider the context
It’s important to consider the context of search terms. For example, users might be searching for ‘teachers pension increase’ but that’s not something we would cover on the GIT website. A term like this is more likely to be from users who are already teachers and their query would be better answered by the teacher pensions website.
Some terms may:
- not be teaching specific (‘uk qualifications’)
- be too broad (‘high school teacher’)
- be addressed by other services, such as Teaching Vacancies (‘english teacher jobs’)
You can find out more about optimising content for what users are searching for by viewing the following documents from the Autumn 2024 SEO review:
- keyword map
- content optimisation guidance These are stored in the Get Into Teaching Ebsite Project folder in Teacher Services SharePoint.
Internal links
Internal linking is when a page on a website links through to another page on the same website. This is important for SEO as it helps the search engines understand which pages relate to each other. It also helps users navigate the site.
When creating or updating a page, make sure:
- all pages have more than one internal link
- use the keyword that you want the page to rank for as the anchor text, e.g. use ‘qualified teacher status (QTS)’ as the link rather than ‘you’ll be qualified as a teacher’
- internal links link to the canonical version of pages (these are the pages we want to rank) so they do not have to go through redirects
- you link to any new pages from existing, relevant pages
URL structure
The URL on a page helps the search engines understand what a page is about.
When creating a page or updating a URL, make sure:
- the URL includes a target keyword, where it is sensible to do so e.g.
/train-to-be-a-teacher/teacher-degree-apprenticeships, rather than/train-to-be-a-teacher/tda - URLs are short and make sense when read by humans
Headers
Where possible, include keywords in the content headers. Headers should follow a clear structure e.g. H1, H2, and H3. This is important for accessibility, as well as SEO.
Acronyms
Users may not know certain acronyms well enough to include them in their search terms. Always spell out words in full first, and more than once, if they are the keywords for a particular page.
In some cases, users may be more familiar with the acronym than the full word. For example:
- ‘QTS’ gets more searches than ‘qualified teacher status’
- ‘teacher degree apprenticeship’ gets more searches than ‘TDA’
You can find out more about how we use acronyms in the:
Front matter
In our frontmatter we can populate several values that are used for SEO:
title: "A title for the page"
description: "A description of the page"
image: "path/to/image.png"
date: "2021-11-01"
Ideally all titles should be unique, descriptions should be no more than 160 characters and the image will most likely be visible when sharing web page links via social media platforms. If a date is specified it will be used as the last modified date for the sitemap entry.
Monitoring SEO impact
You can use Search Console to get an idea of how a search term or page is performing.
- Click on the date filter in the ‘Search Results’ section.
- Select ‘Compare’.
- Compare a date range before your changes with a similar period after the changes.
- Check for improvements in clicks, impressions, and rankings.
You can also check how specific pages are performing:
- Go to ‘Search Results’ and add filter, then select ‘Page’.
- Enter the URL for the page you want to check.
- Review metrics such as impressions, clicks, and position for those pages.
- You can change the dates for individual pages too, so you can compare stats before and after any changes.
To see how keyword targeting is performing:
- Click ‘Search Results’.
- Click ‘Add filter’ and select ‘Query’.
- Enter the query or part of the query e.g. ‘SEND’ will bring any query up with ‘SEND’ in it such as ‘SEND training’.
- Check if optimised keywords:
- have higher impressions and clicks
- have improved their average position in search results
- You can also see how individual pages are doing for specific keywords by filtering by query and page.
It can take weeks or even months for changes to have an impact, so check the above regularly.
Navigation
There are 2 types of navigation components on the website; the main navigation (at the top of every page) and category pages (a page where the navigation component is in the content as a group of cards). They are both configured in a similar way.
Main Navigation
The main navigation appears at the top of every page and contains links to key pages of the website. For a page to appear in the main navigation it must be declared as a “root” page, which means it is in the content directory and not one of its subdirectories. For example /content/my-important-page.md can appear in the main navigation, however /content/subdirectory/my-important-page.md cannot.
In order to have a page appear in the main navigation it must contain the following frontmatter:
navigation: 20
navigation_title: Train to be a teacher
navigation_path: "/train-to-be-a-teacher"
The navigation_title is the text of the link that will appear in the main navigation and the navigation_path is where the link will take the user. The navigation attribute determines the order of the links within the main navigation; ascending order for left to right.
As an example, if there is a navigation page with navigation: 13 and you want your new page to appear immediately after it, then you could use navigation: 14 (if another page is already using 14 you can use decimals for greater flexibility, so 13.1).
Category Pages
A category page displays a number of cards that the user can click on in order to navigate to related content. The category page itself must specify a specific layout in the frontmatter:
layout: "layouts/category"
You can then define the cards/pages within a subfolder matching the main category page. For example, your folder structure may look like:
/main-category-page.md
/main-category-page/first-page.md
/main-category-page/second-page.md
In order for the pages to appear as cards on the main category page they must have navigational attributes defined in the frontmatter:
navigation: 1
navigation_title: Title that appears on the card
navigation_description: A brief description that will appear in the card for this page
The navigation attribute determines the order of the cards on the page (lower values appear first/higher up the page). The navigation_description will appear within the card for this page below a heading, which will match the navigation_title (if set), heading (if navigation_title is not set) or title (if neither navigation_title nor heading are set) from the page frontmatter.
A category page can have multiple sections of related cards. To have cards grouped in a separate section and under a different heading you can use the subcategory attribute in the frontmatter of the related pages:
subcategory: Grouped cards
A category can also contain ‘content’, which is rendered after the cards and can include complex HTML partials. You specify the partials in the frontmatter under the content key:
content:
  - content/main-category-page/partial
In this example the partial file would be declared in content/main-category-page/_partial.html.erb (note the underscore prefix and the file type). It’s likely that a developer will create the partial, but using the frontmatter you can easily pull in and re-arrange existing content partials.
Internship providers
Warning! Do not edit the teaching-internship-providers.md page directly.
Unlike the other content pages the internship providers page is a fully generated page.
This is because occasionally we are sent a new spreadsheet to update the list of internship providers on the teaching-internship-providers.md page and the numbers can be large, and need to be grouped by provider region and sorted, which would be a large and time consuming manual task. We have a rake task to make this easy to do, but this means it should not be edited directly. Instead any changes to content for the page should be made to the lib/tasks/support/teaching-internship-providers.md.erb file and then the page should be regenerated:
- Run
bundle exec rake teaching_internship_providers:generatein your terminal.
When updating not just the text content within the file, but the actual list of providers (which will be provided as an XLSX file), you will need to update the CSV file that the rake task uses to generate the page. To do this:
- Export the XLSX to CSV with filename
internship_providers.csv - Place it in the
lib/tasks/supportdirectory. - Run
bundle exec rake teaching_internship_providers:generate.
Redirect URLs
A redirect is a way to send users to a different page to the URL they requested. We set up redirects where we do things like change the URL of a page, or remove a page. If you need to set up a redirect from an external URL, these are handled in the routes file; you’ll need developer support to create or amend these.
To set up a redirect for a Get Into Teaching page, go to the ‘redirects.yml’ file. This file contains a list of all existing redirects.
To make add a new redirect:
- Redirects are grouped under headings, based on the content they relate to. Check if the redirect you want to add fits under an existing heading. If not, create a new one.
- Add a new line following the same pattern to set up the redirect. The first link should be the page you want to redirect from (your old URL), and the second link should be the page you want to link to (your new URL). Make sure the line is indented (the fine, white line that is currently running on the left hand side of all urls).
- Search the redirect file for any other redirects that link to the page you want to redirect from. You should update these as well to prevent creating a chain of redirects.
---
# Life as a teacher new section
  "/is-teaching-right-for-me": "/life-as-a-teacher"
---
Finding links on the site
You can find everywhere a page is linked to by:
- Go to Github
- There is a search bar in the top right hand side
- You should search a pages path here ie. /subjects/maths
- The system will search for whereever this link is in the code across the website
Resolving comments
People can add comments to pull requests in Github which makes it easier to see feedback and keep track of changes. You can also tag people and reply to their comments.
Once you’ve addressed a comment click on resolve. This hides it from the conversation making it easier to keep track of what’s been updated.
When things go wrong
If you cannot fix an issue yourself, we have a Slack channel where we flag problems with the devs #git-dev-help.
Build errors
When editing content you may find that the pull request build fails, meaning you can’t merge your changes. In an effort to make the debugging process easier and more self-servable we are detailing common failures below and how to resolve them.
The first step is finding out what the build error is:
- Scroll down to the ‘checks’ section of your pull request.
- Find the check that has failed (it will have a red cross next to it and there may be multiple)
- Open the ‘details’ link next to the check(s) that have failed and you should be automatically taken to the failure details, often highlighted in red.
- Cross-reference this error with the errors below to discover the issue and resolution.
A link to a heading on the same page is broken
Example error:
expected to find xpath "//*[@id='other-types-of-visa-you-can-use-to-work-as-a-teacher-in-england']" but there were no matches
Description
This error means there is a hyperlink in your content that is linking to a heading on the same page that cannot be found. The heading may have been renamed or removed.
Resolution
The hyperlink must match the heading title exactly and be suffixed with a hash, for example a heading of This is a heading should be linked to using the markdown [my link](#this-is-a-heading). If you are linking to a heading on another page, ensure the filename matches the path exactly and has a leading slash /.
The filename contains invalid characters
#### Example error:
expected "/non-uk-teachers/fees-and-funding-for-non-UK-trainees" to match /^[a-z0-9\-\/]+$/
Description
This error means the filename contains one or more invalid characters.
Resolution
Check your filename only contains lowercase characters, numbers and underscores.
Linting errors
Linting is the process of automatically checking code for style issues or inconsistencies.
Linting errors can happen because of:
- missing semicolons
- incorrect indentation (spaces vs. tabs)
- unused variables
- typos or mistakes in the code
- extra spaces or missing spaces
If you add something to the wrong branch
You can change the branch you’ve put changes under by going onto the pull request from the branch. At the top there will be a line saying something like: ‘you merged 1 commit into page-titles from Cookies-policy-update 3 hours ago’
If you want to move where this branch sits, click on the first title ‘page titles’ and it will produce a drop down Select the correct place from the drop down.
Merge conflicts
Merge conflicts arise when two different branches alter the same content and both compete to have their changes merged into a common branch (usually master). Merge conflicts can be reduced by regularly keeping your branch synchronised with the master branch. Also try to co-ordinate with colleagues to ensure that you are not working on the same files/content as they are.
Simple merge conflicts can be resolved in the Github text editor by preserving the content which should persist and manually deleting the content which should lapse. For full steps please see:
Complex merge conflicts will need to be resolved via the git commandline and will require developer assistance.